Featured post

Top 5 books to refer for a VHDL beginner

VHDL (VHSIC-HDL, Very High-Speed Integrated Circuit Hardware Description Language) is a hardware description language used in electronic des...

Tuesday, 15 June 2021

Top 5 books to refer for a VHDL beginner


VHDL (VHSIC-HDL, Very High-Speed Integrated Circuit Hardware Description Language) is a hardware description language used in electronic design automation to describe digital and mixed-signal systems such as field-programmable gate arrays and application-specific integrated circuits. To start with learning VHDL we are posting here the list of 5 VHDL books which are a good references to get started with VHDL coding.

1. VHDL: PROGRAMMING BY EXAMPLE - by Douglas L. Perry


  2. Digital Design | With an Introduction to the Verilog HDL, VHDL, and SystemVerilog - by M. Morris Mano


  3. A Vhdl Primer - by Bhasker


4. Fundamentals of Digital Logic with VHDL Design - by Stephen Brown and Zvonko Vranesic


5. Circuit Design and Simulation With VHDL - by Pedroni V.A


Please feel free to send your suggestions if there is any good book in your list. We will be happy to share here.
 

Monday, 7 June 2021

Effective VIM Editor tips, tricks and plugins to improve coding speed in VLSI

One of our colleagues always had to struggle with the Verilog / SystemVerilog syntax. Whenever he opens a .sv file he needs to set the syntax manually as ":set syntax=verilog". This really kills time, especially when you are working on a project with tight schedules. 

So today we are sharing a bunch of good tricks and different plugins that will help you code efficiently, whether Verilog, System Verilog, UVM or scripting languages like Perl. 

VIM editor is so powerful that everything can be modified using the keyboard. No need to raise a hand to reach out to the mouse. Thus the efficiency of working improves a lot and also looks more professional.

By default, vim invokes .vimrc every time a new file is opened. So we may configure any settings upfront in ~/.vimrc for making life easy while working with files.

We will start with basic keyboard shortcuts which will help us to work faster than the actual way.

Opening a fine using GVIM

To open any file from shell type :
gvim <filename>

By default, vim invokes .vimrc every time a new file is opened. So we may configure any settings upfront in ~/.vimrc for making life easy while working with files.

if you want to open multiple files in tab pages
gvim -p <filename1> <filename2> ..

if you want to open multiple files in horizontal windows
gvim -o <filenames>

if you want to open multiple files in vertical windows
gvim -O <filenames>

Shortcuts for moving the cursor:

h - move left
j - move down
k - move up
l - move right

Shortcuts for quick editing:

Letter level
r - quickly replaces the letter under the cursor.
i - change to insert mode. (ready for typing from before the cursor position) Esc to come out of insert mode.
I - change to insert mode at the start of a line.
a - change to append mode. (ready for typing after the cursor position), type ESC to come out of append mode.
A - change to append mode at the end of the line.
x - deletes the alphabet under the cursor and starts deleting the forward direction.
X - exactly like the backspace function.
o - change to insert mode on the next line.
O - change to insert mode on the previous line.
f - find a letter in the forward direction of a line.
F - find a letter in the backward direction of a line.

Word Level
w - move to the start of one word at a time.
      You can put any number upfront to move that many words
      Eg: 5w - From 1st word jumps to the start of 6th word.

b - move to the beginning of the word at a time.
e - move to the end of one word at a time.
y - yanks (that means you can copy a word till the end of a word, or a line, etc by using commands ye, yw, yy, etc)
p - paste whatever is yanked after the cursor
P - paste whatever is yanked before the cursor
d - deletes (that means you can delete a word till the end of a word, or a line, etc by using commands de, dw, dd, etc)
D - deletes from the cursor position to the end of the line.
0 - Go to the start of the Line.

Other General commands with keys
u - undo
gg - Go to the start of the file
G -  Go to the end of the file
ZZ - write, save and close the file
H - Head of the file in the visible pane
M - Middle of the file in the visible pane.
L - Last of the file in the visible pane.
v- enter visual mode from the alphabet under the cursor.
V - enter visual mode from the line under the cursor.
Advanced commands :
q - recording (will explain this in detail)
/ - search a word (eg : /<pattern>)
n- searches any word in forwarding direction
N - searches any word in the backward direction
. - repeats the last done job again.
? - for searching a word backward (more powerful than / )

Other General commands with additional keys
ctrl + e - scroll in forward direction
ctrl + p - scroll in backward direction
ctrl + r - redo
ctrl + a - increment the number in the line.
ctrl + x - decrement the number in the line.
ctrl + q or ctrl + v, enter visual mode in the column.
Shift + ~ - Invert the text case under the cursor
Vu  - if you want to convert the whole line of text under the  cursor to a Lowercase line
VU - if you want to convert the whole line of text under the  cursor to an Uppercase line

In gvim by typing ":" we enter into command line mode, we have a specific set of commands to use at this level.

How do I switch between panes in a split mode in Vim/GVIM ??

In command mode, hit Ctrl-W and then a direction, or just Ctrl-W again to switch between panes.
:b <number>  will open the specified buffer in the current pane.
Example  : UNIX > vim test_1 test_2 ; #  This command opens two test_1 and test_2 files
But in vim, we can see only one file(by default the first file test_1) with this approach.
If want to go to the test_2 file then use :b 2

:ls will show your open buffers
If we opened multiple vim files like above and want to know which are in buffer use this command
and with the help of :b <number>, we can switch between files

If we open many windows in vim/gvim  and you want to have equal window size for all split pans
Esc mode  Ctrl+W =
For more info type:
:help window-resize

you can use <ctrl> + w + w To switch the panes in order.
A suggested way is to put these codes in your vimrc file

map <C-j> <C-W>j
map <C-k> <C-W>k
map <C-h> <C-W>h
map <C-l> <C-W>l

How to remove blank lines from a file?

Here's a handy one-liner to remove blank lines from a file.
           :g/^$/d
Breaking this down. The "g" will execute a command on lines that match a regular expression.
The regular expression matches blank lines, and the command is "d" (delete).
You can also use
           :v/./d
(v means complementary, so any line that doesn’t have a single character at least will be deleted)

How to implement AUTO-COMPLETION 

Ctrl+p   to insert the previous matching word
Ctrl+n  to insert the next matching word
Ctrl +x  followed by Ctrl+l to complete a whole line from the buffer
(basically ctrl + x pressing will open a sub-mode from there on we can do a lot of stuff.
for example ctrl + l in submodel gives you to complete the whole line )


More content coming soon ....

Tuesday, 4 May 2021

UVM Interview Questions - 6

Q36: What is the Difference between UVM_ALL_ON and UVM_DEFAULT?

UVM_ALL_ON and UVM_DEFAULT are identical. As per the UVM reference manual:

UVM_ALL_ON: Set all operations on (default).
UVM_DEFAULT: Use the default flag settings.

It is recommended to use UVM_DEFAULT instead of UVM_ALL_ON even though they both essentially do the same thing today. At some point in time, the class library may add another "bit-flag" which may not necessarily be the DEFAULT.
If you use UVM_ALL_ON, that would imply that whatever flag it is would be "ON".


Q37: What drain time in UVM?

The drain time means the access time that you use before ending the simulation. Suppose if we are done with input traffic to the DUT didn't mean that nothing else would happen from that point as the DUT may have required some additional time to complete any transactions that were still being processed. Setting a drain time adds an extra delay from the time that all objections were dropped to the stop of the simulation, making sure that there were no outstanding transactions inside DUT at that point.

You can set the drain time in the base test at the end_of_elobration phase as shown below:

class test_base extends uvm_test;
  // ...
  
  function void end_of_elaboration_phase(uvm_phase phase);
    uvm_phase main_phase = phase.find_by_name("main", 0);
    main_phase.phase_done.set_drain_time(this, 10);
  endfunction
  
  // ...
endclass

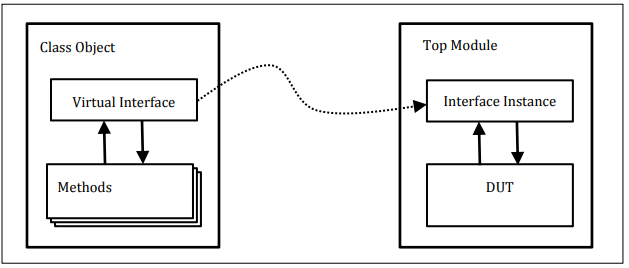
Q38: What is Virtual interface and how Virtual interface is used?

"Virtual interfaces are class data member handles that point to an interface instance. This allows a dynamic class object to communicate with a Design Under Test (DUT) module instance without using hierarchical references to directly access the DUT module ports or internal signals."


Below shown sample code is the easier way to use the virtual interface handles in the UVM environment. 
module top;
  …
  dut_if dif;
  …
  initial begin

    uvm_config_db#(virtual dut_if)::set(null, "*", "vif", dif);

    run_test();

  end
endmodule

class tb_driver extends uvm_driver #(trans1);
  …
  virtual dut_if vif;
  …
  function void build_phase(uvm_phase phase);
    super.build_phase(phase);

    // Get the virtual interface handle that was stored in the
    // uvm_config_db and assign it to the local vif field.
    if (!uvm_config_db#(virtual dut_if)::get(this, "", "vif", vif))
      `uvm_fatal("NOVIF", {"virtual interface must be set for: ",

     get_full_name(), ".vif"});
   endfunction
  …
endclass 
As shown first the actual interface or physical interface handle, dif, is stored into the uvm_config_db at string location "vif" using the set() command just before the run_test() call in the top level module.

Then it shows the use of the get() function of the uvm_config_db to retrieve the virtual interface handle from the same "vif" location and assign it to the local vif virtual interface handle in the driver class (the same code will be used inside of the monitor class as well).

Q39: How to add a user-defined phase in UVM?

If needed a user can create user-defined phases in the UVM environment. However, this may impact the re-usability of the component. To define a custom phase user need to extend the appropriate base class for phase-type. Following are the available base classes.

    class my_phase extends uvm_task_phase;
    class my_phase extends uvm_topdown_phase;
    class my_phase extends uvm_bottomup_phase;

You can refer to the UVM PHASE IMPLEMENTATION EXAMPLE for complete user-defined phase understanding.

Q40: How interface is passed to components in UVM?

The passing of interface is done using the virtual interface to the component is done using set() and get() methods. consider the below example:
Consider we have defined 2 interfaces as

apb_if intf0(.pclk(clk));
apb_if intf1(.pckl(clk));

Setting the interface:
initial begin
   //put in the database the interface used by APB agent agent0
   uvm_config_db#(virtual apb_if)::set(null, "uvm_test_top.env.agent0*", "VIRTUAL_INTERFACE", intf0);

   //put in the database the interface used by APB agent agent1
   uvm_config_db#(virtual apb_if)::set(null, "uvm_test_top.env.agent1*", "VIRTUAL_INTERFACE", intf1);
end


Getting the interface:
class cfs_apb_agent extends uvm_component;
   
   //pointer to the interface
   virtual cfs_apb_if vif;
   
   virtual function void build_phase(uvm_phase phase);
      super.build_phase(phase);
     
      if(uvm_config_db::#(virtual apb_if)::get(this, "", "VIRTUAL_INTERFACE", vif) == 0) begin
         `uvm_fatal("ISSUE", "Could not get from the database the virtual interface for the APB agent")
      end
   endfunction

endclass


<< PREVIOUS    NEXT >>